The extensible data security framework is a new feature in Microsoft Dynamics AX 2012 that enables developers and administrators to secure data in shared tables such that users have access to only the part of the table that is allowed by the enforced policy. This feature can be used in conjunction with role-based security (also supported in Microsoft Dynamics AX 2012) to provide more comprehensive security than was possible in the past.
Extensible data security is an evolution of the record-level security (RLS) that was available in earlier versions of Microsoft Dynamics AX. Extensible data security policies, when deployed, are enforced, regardless of whether data is being accessed through the Microsoft Dynamics AX rich client forms, Enterprise Portal webpages, SSRS reports, or .NET Services [MS help]
simple example:
Requirement is to show a particular user only those Bank accounts that belongs to the Bank group “BankCNY”
Below are the Bank accounts that are available in my system. By using policy framework on roles , I can restrict user to view only bank accounts that belong to Bank group “BankCNY”

First of all , where are these policies in AX? They are actually in the AOT >> Security >> Policies

Before we create policies, we need to create a query to use it in policies. Remember, try to optimize the queries to the best otherwise it might lead to performance issues.
To keep it very simple, Create a Query by name SR_BankAccountTable by adding data source[PrimaryTable] as “BankAccountTable” and add a range on BankGroupId field and set it to “BankCNY” as shown below

Now let us create a new Role by name SR_BankController as shown below
Go to AOT >> Security >> Roles >> New Role

Set the following properties of the newly created role by right clicking and going to properties

Now lets create duties for this role: In this example I will create one simple duty called “SR_BankAccountsMaintain”
Go to AOT >> Security >> Duties >> Right click >> New Duty

Set the following properties for the newly create duty. Name it as “SR_BankAccountsMaintain” and provide label and description as shown below

Now, let us create a new privilege and add entry points [Menu Items] to it to provide only access to the user
Go to AOT >> Security >> Privilege >> New Privilege.

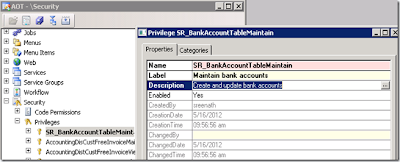
Name the privilege as “SR_BankAccountTableMaintain” and set the label and Description as shown below
Now drag and drop some menu items on to Entry points from AOT >> Menu Items >> Display as shown below

Now add this newly created privilege “SR_BankAccountTableMaintain” to the duty “SR_BankAccountMaintain” which we have created.

Then, add SR_BankAccountsMaintain duty to the Role SR_BankController

Now, let us create a new Policy by name “SR_BankAccountPolicy” and set the properties as shown below

Set the below properties

In the above screen, Select the context type as “RoleName“ and the role “SR_BankController” and select the query as ”SR_BankAccountTable”
PrimaryTable : should always be the first data source Table which you have added in the query. So, select BankAccountTable
A constrained table is the table or tables in a given security policy from which data is filtered or secured, based on the associated policy query. For example, in a policy that secures all sales orders based on the customer group, the Sales Order table would be the constrained table. Constrained tables are always explicitly related to the primary table in the policy [MS Help]
A policy context is a piece of information that controls the circumstances under which a given policy is considered to be applicable. If this context is not set, then the policy, even if enabled, is not enforced.
Contexts can be of two types: role contexts, and application contexts. A role context enables policy application based on the role or roles to which the user has been assigned. An application context enables policy application based on information set by the application
we are almost done, we need to add this role= to some user and verify whether he is able to see only Bank accounts that belongs to BankCNY group
Go to System Administration >> Users >> select any user >> Click on Assign roles.
Select “Bank Accounts controller” and click on Ok Button.

Now , let us log in with the user credentials for which we have assigned the new Role and verify the Bank accounts.
As you see, the user can only see the Bank accounts which belong to “BankCNY” group.

Extensible data security is an evolution of the record-level security (RLS) that was available in earlier versions of Microsoft Dynamics AX. Extensible data security policies, when deployed, are enforced, regardless of whether data is being accessed through the Microsoft Dynamics AX rich client forms, Enterprise Portal webpages, SSRS reports, or .NET Services [MS help]
simple example:
Requirement is to show a particular user only those Bank accounts that belongs to the Bank group “BankCNY”
Below are the Bank accounts that are available in my system. By using policy framework on roles , I can restrict user to view only bank accounts that belong to Bank group “BankCNY”

First of all , where are these policies in AX? They are actually in the AOT >> Security >> Policies
Before we create policies, we need to create a query to use it in policies. Remember, try to optimize the queries to the best otherwise it might lead to performance issues.
To keep it very simple, Create a Query by name SR_BankAccountTable by adding data source[PrimaryTable] as “BankAccountTable” and add a range on BankGroupId field and set it to “BankCNY” as shown below

Now let us create a new Role by name SR_BankController as shown below
Go to AOT >> Security >> Roles >> New Role

Set the following properties of the newly created role by right clicking and going to properties

Now lets create duties for this role: In this example I will create one simple duty called “SR_BankAccountsMaintain”
Go to AOT >> Security >> Duties >> Right click >> New Duty

Set the following properties for the newly create duty. Name it as “SR_BankAccountsMaintain” and provide label and description as shown below

Now, let us create a new privilege and add entry points [Menu Items] to it to provide only access to the user
Go to AOT >> Security >> Privilege >> New Privilege.

Name the privilege as “SR_BankAccountTableMaintain” and set the label and Description as shown below

Now drag and drop some menu items on to Entry points from AOT >> Menu Items >> Display as shown below

Now add this newly created privilege “SR_BankAccountTableMaintain” to the duty “SR_BankAccountMaintain” which we have created.

Then, add SR_BankAccountsMaintain duty to the Role SR_BankController

Now, let us create a new Policy by name “SR_BankAccountPolicy” and set the properties as shown below
Set the below properties

In the above screen, Select the context type as “RoleName“ and the role “SR_BankController” and select the query as ”SR_BankAccountTable”
PrimaryTable : should always be the first data source Table which you have added in the query. So, select BankAccountTable
A constrained table is the table or tables in a given security policy from which data is filtered or secured, based on the associated policy query. For example, in a policy that secures all sales orders based on the customer group, the Sales Order table would be the constrained table. Constrained tables are always explicitly related to the primary table in the policy [MS Help]
A policy context is a piece of information that controls the circumstances under which a given policy is considered to be applicable. If this context is not set, then the policy, even if enabled, is not enforced.
Contexts can be of two types: role contexts, and application contexts. A role context enables policy application based on the role or roles to which the user has been assigned. An application context enables policy application based on information set by the application
we are almost done, we need to add this role= to some user and verify whether he is able to see only Bank accounts that belongs to BankCNY group
Go to System Administration >> Users >> select any user >> Click on Assign roles.
Select “Bank Accounts controller” and click on Ok Button.

Now , let us log in with the user credentials for which we have assigned the new Role and verify the Bank accounts.
As you see, the user can only see the Bank accounts which belong to “BankCNY” group.


No comments:
Post a Comment